Introduction: The Significance of CE and UL Certified Door Hinges
Door hinges may appear uncomplicated, yet they are crucial for ensuring the safe and reliable functioning of doors. In both commercial and residential projects, hinges do more than just hold doors in place; they must adhere to safety, durability, and fire resistance standards.
This is precisely why numerous contractors and buyers nowadays opt for CE and UL certified door hinges.
The CE mark signifies compliance with European standards like EN1935, which encompass mechanical performance, durability (tested for over 200,000 cycles), antirust (test for 240 hours corrosion resistance EN1670) and EN1634 fire resistance (192mins/260mins) .
Conversely, the UL (Underwriters Laboratories) certification verifies that a hinge can endure intense fire exposure as per UL10C fire test standards, often lasting up to 3 hours.


These certifications offer reassurance to B2B buyers, contractors, and project developers, guaranteeing that every piece of door hardware is tested, safe, and compliant with regulations.
However, apart from fire safety and durability, hinges occasionally require adjustment, repair, or replacement. A common maintenance task involves removing a hinge pin, enabling you to detach a door from its frame without unscrewing the entire hinge.

Why Remove a Door Hinge Pin?
Removing the hinge pin becomes necessary in several typical scenarios:
· Door Replacement: When installing a new door, removing the pins simplifies the process of taking down the old one.
· Painting or Refinishing: Contractors frequently remove doors to paint walls or apply finishes without any hindrance.
· Door Repair or Adjustment: If a door is sagging, squeaking, or misaligned, removing the hinge pin facilitates easy adjustment or lubrication.
· Upgrading Hardware: When upgrading to a fire-rated CE or UL hinge, removing the pin aids in replacing the old hinge without disrupting the entire frame.
Tools You May Require
Removing a hinge pin is relatively straightforward and doesn't necessitate specialized tools. Common tools include:
· Flathead screwdriver or small chisel
· Hammer or mallet
· Pliers (optional, for gripping stubborn pins)
· Nail or punch tool (for driving out tight pins)
· Cloth or cardboard (to safeguard surfaces from scratches)

Step-by-Step Guide: How to Remove a Door Hinge Pin
Step 1: Open the Door for Access
Start by opening the door wide enough to reach the hinges. For safety, ensure the door is stable and won't swing unexpectedly when the pin is loosened. If the door is particularly heavy, consider enlisting the help of a second person.
Step 2: Locate the Pin
Inspect the hinge. Most traditional butt hinges and pin-style hinges feature a removable cylindrical pin running through the knuckles. On fire-rated CE and UL hinges, the pin is typically non-rising and secure, but it can still be removed using the correct method.
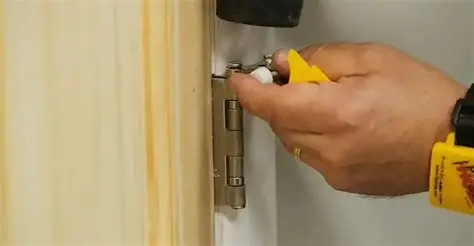
Step 3: Position the Screwdriver
Place the flathead screwdriver beneath the lip of the hinge pin (if the pin has a small head). If the hinge lacks a visible cap, use a punch or nail from the bottom of the hinge barrel to push the pin upward.
Step 4: Tap the Pin Loose
Using a hammer or mallet, gently tap the screwdriver or punch upward to loosen the pin. For tight or corroded hinges, employ controlled, firm taps to avoid bending the hinge knuckles.
Step 5: Pull Out the Pin
Once the pin starts to lift, grasp it with pliers or your fingers and pull it upward until fully removed. If it feels stuck, twist it gently while pulling.
Step 6: Repeat for All Hinges
Most doors have two or three hinges. Repeat the process for each hinge until all pins are removed. At this juncture, the door can be lifted away from the frame.

Tips for Success
· Use Lubrication: If the pin is rusty or painted over, apply a small amount of penetrating oil and let it sit before removal.
· Protect Surfaces: Place a cloth beneath your tools to prevent scratching the hinge or door finish.
· Support Heavy Doors: Have a helper support the door as the last hinge pin is removed to prevent sudden drops.
· Check Pin Orientation: Some hinges are designed with non-removable security pins, particularly on exterior or high-security doors. In such cases, consult the manufacturer before attempting removal.
After Removing the Pin
Once the hinge pins are removed, you can:
· Take down the door for painting or refinishing.
· Replace the hinge with a fire-rated CE or UL hinge for enhanced compliance and durability.
· Clean and lubricate the pins to minimize squeaking and improve smooth operation.
When reinstalling, simply reverse the process—align the hinge knuckles, insert the pin from the top, and tap it gently into place.

Conclusion
Removing a door hinge pin is a simple task, yet it plays a vital role in door maintenance, adjustment, and hardware upgrades. For B2B buyers and contractors, comprehending not only the mechanics of hinge maintenance but also the value of certified CE and UL fire-rated hinges is crucial.
By opting for certified hardware, you ensure that every door in your project adheres to international safety and performance standards, while still allowing for easy maintenance and flexibility. Whether you're upgrading to fire-rated stainless steel hinges or simply taking down a door for painting, the ability to remove hinge pins correctly saves time, prevents damage, and guarantees smooth operation for years to come.
Contact us now:
Contact: David Jian
Mob: 0086-139 2903 7292
Email: David@dndhardware.com, sales@dndhardware.com
Jobby Zhang
Mob: 0086-137 2599 9617
Email: jobby@dndhardware.com


 English